

Golang项目中使用captcha作为验证码调用
(captcha不止图片验证,一下以图片验证为例)
先说说验证码调用思路:
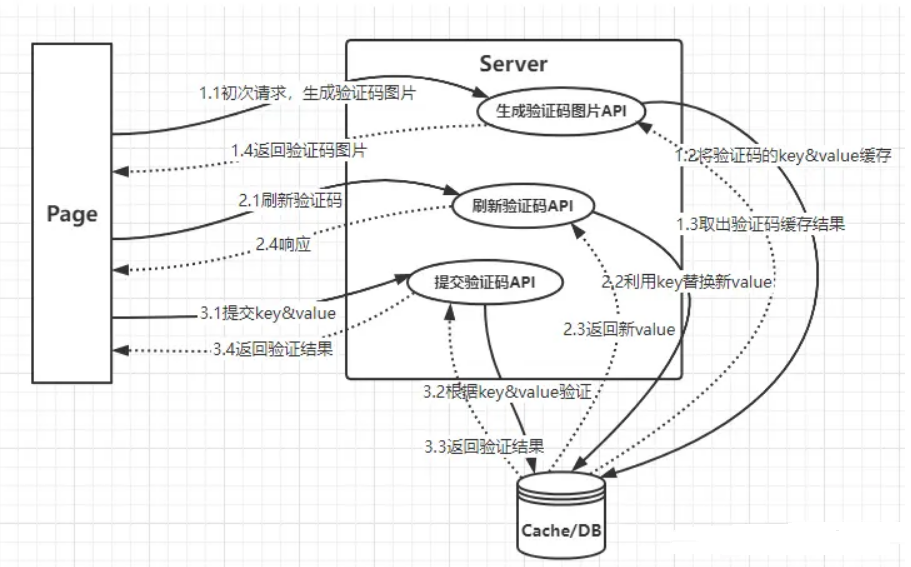
以注册为例在前端请求后端获取验证图片,等待验证,后端返回图片和对应的id(标识这个图片的唯一标识符),在前端进行验证等待验证完毕生成对应的验证值,在注册的时候一并提交到后端进行判断,后端先进行判断传进来的验证码的参数等是否正确在进行判断注册流程(例如接下来在判断用户名是否存在等)
这里使用bee go进行演示,其他的框架例如gin或原生go都大同小异
生成验证码的内容
func (c Captcha) GetImg() {
    fmt.Println("ok")
    capt := captcha.GetCaptcha()

    // 生成验证码
    dots, b64, tb64, key, err := capt.Generate()
    if err != nil {
        panic(err)
        return
    }

    // 主图base64
    fmt.Println(len(b64))
    //fmt.Println("base 64 : ", b64)
    // 缩略图base64
    fmt.Println(len(tb64))
    fmt.Println("base 64 : ", tb64)
    // 唯一key
    fmt.Println(key)

    // 文本位置验证数据
    fmt.Println(dots)

}
生成验证码
将唯一标识符写入用于判断
可以看到这里写入的方法是写入一个json文件中,这里作为演示但实际使用中较多的是存入Redis中
func writeCache(v interface{}, file string) {
    bt, _ := json.Marshal(v)
    month := time.Now().Month().String()
    cacheDir := getCacheDir() + month + "/"
    _ = os.MkdirAll(cacheDir, 0660)
    file = cacheDir + file + ".json"
    logFile, _ := os.OpenFile(file, os.O_RDWR|os.O_CREATE|os.O_APPEND, 0644)
    defer logFile.Close()
    // 检查过期文件 并清理
    checkCacheOvertimeFile()
    _, _ = io.WriteString(logFile, string(bt))
}
检查过期文件进行清理防止过多文件占用大量内存
/**
* @Description: 检查缓存超时文件, 30分钟
*/
func checkCacheOvertimeFile() {
files, files1, _ := listDir(getCacheDir())
for _, table := range files1 {
temp, _, _ := listDir(table)
for _, temp1 := range temp {
files = append(files, temp1)
}
}
for _, file := range files {
t := GetFileCreateTime(file)
ex := time.Now().Unix() - t
if ex > (60 * 30) {
_ = os.Remove(file)
}
}
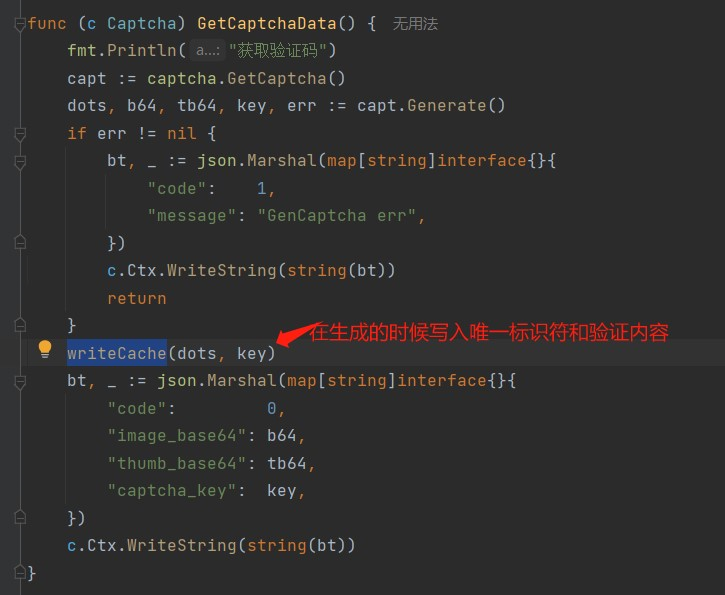
}//接口方法
func (c Captcha) GetCaptchaData() {
fmt.Println("获取验证码")
capt := captcha.GetCaptcha()
dots, b64, tb64, key, err := capt.Generate()
if err != nil {
bt, _ := json.Marshal(map[string]interface{}{
"code": 1,
"message": "GenCaptcha err",
})
c.Ctx.WriteString(string(bt))
return
}
writeCache(dots, key)
bt, _ := json.Marshal(map[string]interface{}{
"code": 0,
"image_base64": b64,
"thumb_base64": tb64,
"captcha_key": key,
})
c.Ctx.WriteString(string(bt))
}验证验证码
若通过校验则返回 0

验证验证码代码:
func (c Captcha) CheckCaptcha() {
fmt.Println("验证验证码")
code := 1
dots := c.GetString("dots")
key := c.GetString("key")
if dots == "" || key == "" {
bt, _ := json.Marshal(map[string]interface{}{
"code": code,
"message": "dots or key param is empty",
})
c.Ctx.WriteString(string(bt))
}
cacheData := readCache(key)
if cacheData == "" {
bt, _ := json.Marshal(map[string]interface{}{
"code": code,
"message": "illegal key",
})
c.Ctx.WriteString(string(bt))
}
src := strings.Split(dots, ",")
var dct map[int]captcha.CharDot
if err := json.Unmarshal([]byte(cacheData), &dct); err != nil {
bt, _ := json.Marshal(map[string]interface{}{
"code": code,
"message": "illegal key",
})
c.Ctx.WriteString(string(bt))
}
chkRet := false
if (len(dct) * 2) == len(src) {
for i, dot := range dct {
j := i * 2
k := i*2 + 1
sx, _ := strconv.ParseFloat(fmt.Sprintf("%v", src[j]), 64)
sy, _ := strconv.ParseFloat(fmt.Sprintf("%v", src[k]), 64)
// 检测点位置
// chkRet = captcha.CheckPointDist(int64(sx), int64(sy), int64(dot.Dx), int64(dot.Dy), int64(dot.Width), int64(dot.Height))
// 校验点的位置,在原有的区域上添加额外边距进行扩张计算区域,不推荐设置过大的padding
// 例如:文本的宽和高为30,校验范围x为10-40,y为15-45,此时扩充5像素后校验范围宽和高为40,则校验范围x为5-45,位置y为10-50
chkRet = captcha.CheckPointDistWithPadding(int64(sx), int64(sy), int64(dot.Dx), int64(dot.Dy), int64(dot.Width), int64(dot.Height), 5)
if !chkRet {
break
}
}
}
if chkRet {
// 通过校验
code = 0
}
bt, _ := json.Marshal(map[string]interface{}{
"code": code,
})
c.Ctx.WriteString(string(bt))
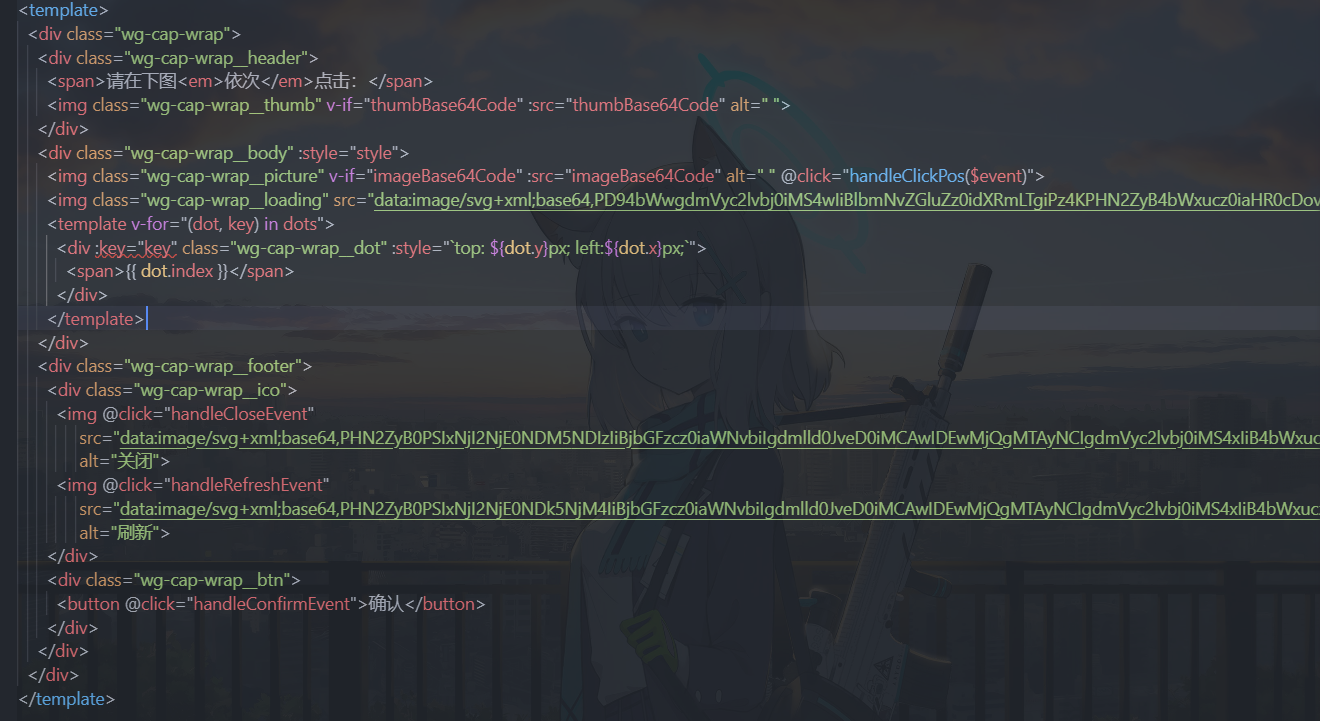
}前端核心调用代码
/**
         * 处理请求验证码
         */
        handleRequestCaptCode() {
            this.captBase64 = ''
            this.captThumbBase64 = ''
            this.captKey = ''

            this.$axios({
                method: 'get',
                url: '/api/api/go_captcha_data',
            }).then((response) => {
                const {
                    data = {}
                } = response;
                if ((data['code'] || 0) === 0) {
                    if (this.$lodash.isEmpty(data)) {
                        return
                    }

                    this.captBase64 = data['image_base64'] || ''
                    this.captThumbBase64 = data['thumb_base64'] || ''
                    this.captKey = data['captcha_key'] || ''
                } else {
                    this.$message({
                        message: `获取人机验证数据失败`,
                        type: 'warning'
                    })
                }
            })
        }
/**
* 处理验证码校验请求
*/
handleConfirm(dots) {
if (this.$lodash.size(dots) <= 0) {
this.$message({
message: `请进行人机验证再操作`,
type: 'warning'
})
return
}
let dotArr = []
this.$lodash.forEach(dots, (dot) => {
dotArr.push(dot.x, dot.y)
})
this.$axios({
headers: {
'Content-Type': 'application/x-www-form-urlencoded'
},
method: 'post',
url: '/api/api/go_captcha_check_data',
data: Qs.stringify({
dots: dotArr.join(','),
key: this.captKey
})
}).then((response) => {
const {
data = {}
} = response;
if ((data['code'] || 0) === 0) {
this.$message({
message: `人机验证成功`,
type: 'success'
})
this.captStatus = 'success'
this.captAutoRefreshCount = 0
} else {
this.$message({
message: `人机验证失败`,
type: 'warning'
})
if (this.captAutoRefreshCount > 5) {
this.captAutoRefreshCount = 0
this.captStatus = 'over'
return
}
this.handleRequestCaptCode()
this.captAutoRefreshCount += 1
this.captStatus = 'error'
}
})
}到这里就讲完了,可以在验证阶段的时候把验证方法加入到你的注册(或其他)接口中,先进行验证验证码是否正确在进行接下来的注册操作
版权属于:戏人看戏博客网
本文链接:https://day.nb.sb/archives/1376.html
若无注明均为戏人看戏原创,转载请注明出处,感谢您的支持!
最后更新 2023-11-03